

Even in 3ds Max and VRay, creating a glass material can be somewhat tricky to get right in the first go. Not to mention how much it taxes the system while rendering. But since Unreal Engine is a realtime editor, you can try as many variations as you like for creating the perfect glass look.
Let me teach you my own method of creating a realistic glass material in Unreal Engine. This method can be a pretty good basis for creating something even more complex, cause when it comes to glass, there can never be enough tweaking!
Sign up for the Full UE4 for Visualization Workshop HERE and start creating fully interactive photoreal scenes like a PRO.
We’re going to setup our glass material by first creating a base material. Then we’ll convert some nodes into parameters for our instanced materials. Instanced materials have the benefit of realtime control over your material as you’re changing each parameter within the scene. Whereas a base material would first need to be compiled. This base material would then serve as our master material for all the different instances we might create.
Glass Base Material
Follow the steps below to create an all-purpose base glass material:
- When working in UE4, it’s best to create a separate folder for all asset types. Create a folder titled Materials and add a new material to it.
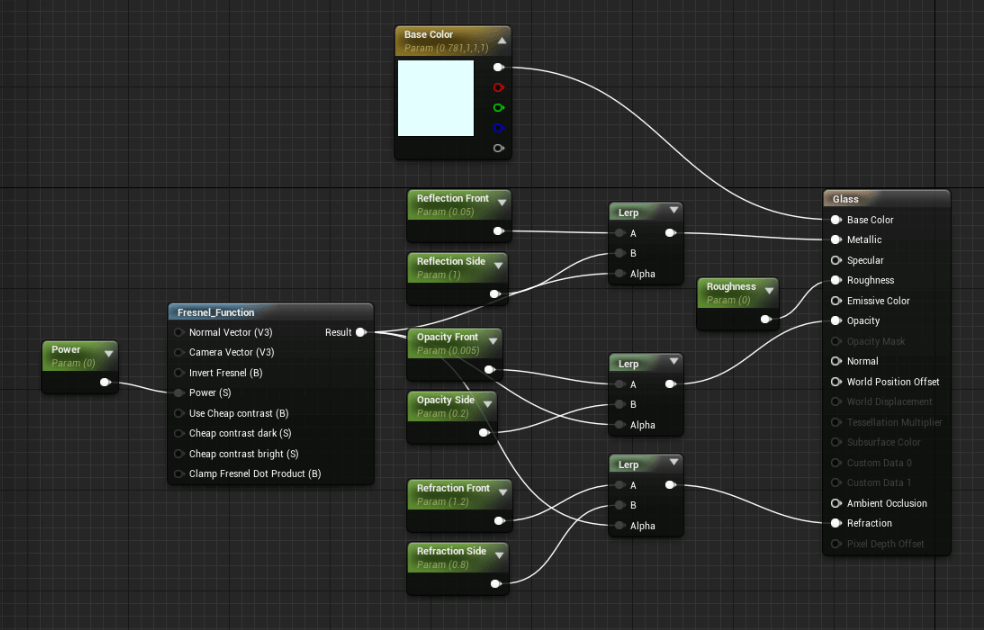
- Open up this material so we can start adding all the appropriate nodes to it. Create a Constant3Vector node for the base color. Set it a pale teal color. Right-click and convert it into a Parameter node and name it ‘Base Color’.
- Add a Constant node of 0 value to Roughness slot. Convert it to a parameter if you’d like to add some roughness later.
- Next we’ll set the global properties of this material in the Details tab on the left.
- Set Blend Mode to Translucent.
- Uncheck Two-Sided.
- Set Lighting Mode to Surface Translucency Volume. This will allow the light to pass through the glass objects.
- Now we’ll add 3 LERP (Linear Interpolate) nodes to the Metallic, Opacity and Refraction slots. These 3 will then be controlled by our single fresnel power.
- Add a Constant Parameter to each of the A and B slots of our 3 Lerps. Name the A slots as front and B as side, with the property name they’re connected to as well.
- Set the default values of Reflection Front and Side as 0.05 and 1.0 respectively.
- Values of Opacity Front and Side as 0.005 and 0.2 respectively.
- Lastly, values of Refraction Front and Side as 1.2 and 0.8 respectively.
- As a final step, we’ll add a Vector Fresnel Function to the alpha slots of our Lerps. Add a Constant Parameter to this fresnel’s power and name it ‘Power’.
Glass Material Instance
Now save the material and create an instance in the Content Browser. Right click the material and choose ‘Create Material Instance’. Now you can use this version in your scene and at the same time tweak the values to your liking.
Sign up for the Full UE4 for Visualization Workshop HERE and start creating fully interactive photoreal scenes like a PRO.
I took VRay’s principle of “Fresnel” IOR function and applied it to reflection, refraction and opacity values. Trick is to convert everything into parameters and then instance that material for tweaking.
Post your questions or views below in the comment section.
Share it / Like it
Talk soon,
Alex
