

When working on projects in Unreal Engine, one of the most basic things you’ll want to implement is an Interactive Door functionality. Since the whole premise of a real-time game engine is maximum interactivity, your projects will be all the more amazing with their inclusion. Given the scale of any UE4 project, you might end up having a lot of doors. And a simple blueprint programming can enable the explorer to open and close any one of them.
In this tutorial I’ll touch on this subject and demonstrate how to build and apply such a blueprint with minimal effort. The blueprint system is simple but very powerful and allows for every type of interaction programming.
If you have never tried creating a blueprint before, this lesson will serve as a perfect introduction for you. So let’s jump right in.
Sign up for the Full UE4 for Visualization Workshop HERE and start creating fully interactive photorealistic scenes like a PRO.
Creating the Blueprint
Our aim with this blueprint will be to enable our virtual character to walk up to a door, press the ‘E’ key and either open or close it. To get started, we’ll need to import our door and its frame into Unreal. Make sure before importing that the world origin of the door is set and aligned with the axis of the rotating hinge. Follow these steps:
- Right click over your door frame and create a blueprint from the menu. By working on the frame you can duplicate and rotate your door position and the script will still function correctly. Now open this blueprint’s Viewport section.
- Duplicate the frame and set it to the door mesh instead. Place the door within the frame. Also add an encompassing box collision volume via Add Component, which will act as our trigger. Name them appropriately.
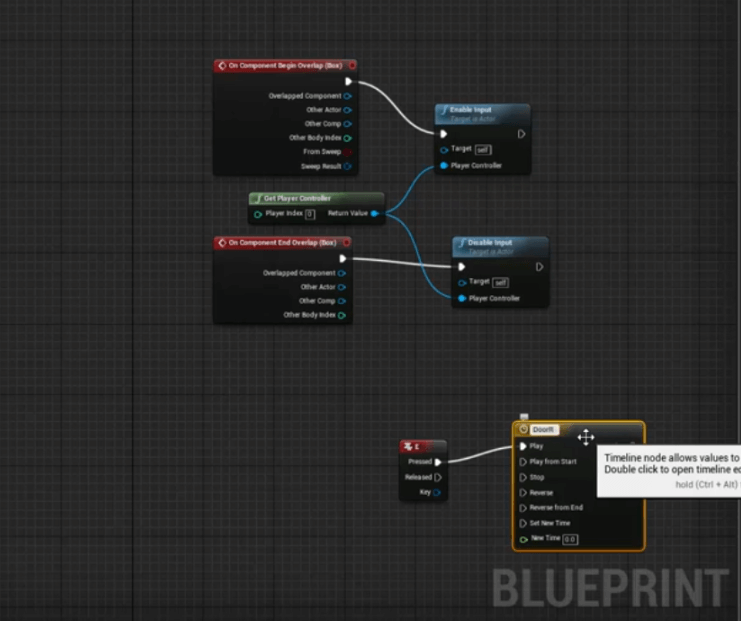
- Next go to the Event Graph section, delete the default nodes, select the box component and right-click on the graph for adding ‘On Component Begin Overlap‘ and ‘On Component End Overlap‘ nodes. Plug them with ‘Enable Input‘ and ‘Disable Input‘ functions respectively. Add a ‘Get Player Controller‘ function and plug it into their Player Controller slot.
- Now we’ll create another node network next to it. Add an ‘E‘ key node, connect its ‘Pressed‘ slot to a new ‘Add Timeline‘ node (name it DoorRotation). Double click to open this rotation node in a tab. Create a track via the ‘float track’ button, and shift click on it to create 2 points. Set the first point’s Time and Value both to 0, and second point’s to 2 and 90. Smoothen up this animation with an S-curve by right clicking the points and selecting ‘Auto‘.
- Drag the door from the Components section into the graph area. Plug it into a ‘Set Relative Rotation‘ function’s Target slot. Connect ‘DoorRotation’ Update slot to this ‘Set Relative Rotation‘ node.
- Connect ‘DoorRotation’ Door Open slot to a new ‘Make Rotator‘ node (Z axis slot). Plug its Return Value slot to the New Rotation slot of ‘Set Relative Rotation‘ node.
Closing the Door
- Now onto adding the close function to our door using the same key. We’ll add a simple if/else setup to our blueprint that’ll close the door if already open.
- Add a ‘Branch‘ node in between ‘E‘ and ‘DoorRotation‘, and plug False slot to Reverse slot of later.
- Create a new variable and name it ‘Closed Door‘, drag onto the graph as GET and connect it to the ‘Branch‘ Condition slot.
- Add a ‘Float‘ function and connect it to ‘DoorRotation‘ Door Open slot. Set its value to 1. Drag the ‘Closed Door‘ variable again, now as SET and connect to this float function.
- Add an ‘Event Tick’ node and plug it into the variable’s main input slot.
- Compile the blueprint and drop it into the scene and test it out.

Don’t fret if it sounds complicated, practice it a few times and you’ll be right at home with the blueprint programming system.
Sign up for the Full UE4 for Visualization Workshop HERE and start creating fully interactive photorealistic scenes like a PRO.
Share it / Like it!
Cheers
